5. 与机器学习框架的整合
5.2. 准备工作
首先,我们导入必要的依赖项。
import numpy as np
import tvm
from tvm import relax
from tvm.ir.module import IRModule
from tvm.script import relax as R
from tvm.script import tir as T
import torch
import torch.nn as nn
from torch import fx
from torch.nn import functional as F
5.3. 通过 Builder 构造 IRModule
在过去的章节中,我们一直在通过直接编写 TVMScript 来构建 IRModule。 随着模型变得越来越大,我们需要一种编程方式来构建 IRModule。在本节中,我们回顾一些支持该过程的工具。
5.3.1. 从张量表达式构造 TensorIR
首先,我们回顾张量表达式 (tensor expression, TE) 这一领域特定语言来构建 TensorIR 函数。
from tvm import te
我们首先创建一个 placeholder,它表示 TensorIR 函数的输入。
A = te.placeholder((128, 128), name="A", dtype="float32")
B = te.placeholder((128, 128), name="B", dtype="float32")
这里的每个输入和中间结果都表示为一个 te.Tensor 对象。
type(A)
每个 te.Tensor 都有一个 shape 字段和 dtype 字段,用于记录计算的
shape 和数据类型。
A.shape
我们可以通过一系列张量表达式来描述计算。这里的 te.compute 使用
te.compute(output_shape, fcompute) 这样的接口。fcompute
函数描述了我们要如何计算给定索引的每个元素 [i, j] 的值。
te_matmul 函数接受一个 te.Tensor
类型的对象,并返回矩阵乘法结果。请注意我们是如何根据 A 和 B 的输入 shape
构造计算的。te_matmul 适用于具有不同输入 shape 的 A 和 B。
def te_matmul(A: te.Tensor, B: te.Tensor) -> te.Tensor:
    assert A.shape[1] == B.shape[0]
    n = A.shape[0]
    m = B.shape[1]
    k = te.reduce_axis((0, A.shape[1]), name="k")
    return te.compute((n, m), lambda i, j: te.sum(A[i, k] * B[k, j], axis=k), name="matmul")
我们可以使用 A 和 B 获得调用 te_matmul 的结果。
C = te_matmul(A, B)
要创建 TensorIR 函数,我们可以调用 te.create_prim_func
并传入输入和输出值。
te.create_prim_func([A, B, C]).show()
我们可以用类似的方式为 ReLU
计算创建张量表达式。在这里,我们写一个可以适用于具有任何维度数量和 shape
的 te.Tensor 的 te_relu 函数。
def te_relu(A: te.Tensor) -> te.Tensor:
    return te.compute(A.shape, lambda *i: te.max(A(*i), 0), name="relu")
让我们在两种不同的输入维度数量和 shape 上尝试 te_relu。 第一个
X1 的尺寸为 (10,)。
X1 = te.placeholder((10,), name="X1", dtype="float32")
Y1 = te_relu(X1)
te.create_prim_func([X1, Y1]).show()
然后是形状为 (10, 20) 的 X2。
X2 = te.placeholder((10, 20), name="X1", dtype="float32")
Y2 = te_relu(X2)
te.create_prim_func([X2, Y2]).show()
te API 允许我们做的另一件事是组合操作并创建“融合
(fused)”算子。例如,我们可以将 matmul 的结果再次应用 relu。
C = te_matmul(A, B)
D = te_relu(C)
我们可以通过只传递感兴趣的输入和输出值,跳过中间值来创建一个 TensorIR 函数。 这将导致 matmul 的结果被分配为 TensorIR 函数中的临时空间。
te.create_prim_func([A, B, D]).show()
我们还可以将中间结果 C 传递到参数列表中。在这种情况下,TensorIR 函数希望我们也从调用方传入 C。通常我们建议只传入输入和输出,这样我们就可以在里面进行更高级的融合。
te.create_prim_func([A, B, C, D]).show()
5.3.2. 使用 BlockBuilder 构造 IRModule
到目前为止,我们已经创建了一个 TensorIR 函数。 为了构建端到端的模型执行,我们还需要能够通过计算图连接多个 TensorIR 函数。
让我们首先创建一个 block builder,它可以帮助我们逐步构建一个
relax.Function。
A = relax.Var("A", relax.TensorStructInfo((128, 128), "float32"))
B = relax.Var("B", relax.TensorStructInfo((128, 128), "float32"))
我们通过创建 block builder 和一系列元张量函数来构造 Relax 函数。
bb = relax.BlockBuilder()

with bb.function("main"):
    with bb.dataflow():
        C = bb.emit_te(te_matmul, A, B)
        D = bb.emit_te(te_relu, C)
        R = bb.emit_output(D)
    bb.emit_func_output(R, params=[A, B])

MyModule = bb.get()
MyModule.show()
5.3.3. 深入理解 BlockBuilder API
现在让我们深入了解 BlockBuilder 的 API。将 BlockBuilder 代码和生成的 IRModule 并排放置会很有帮助。
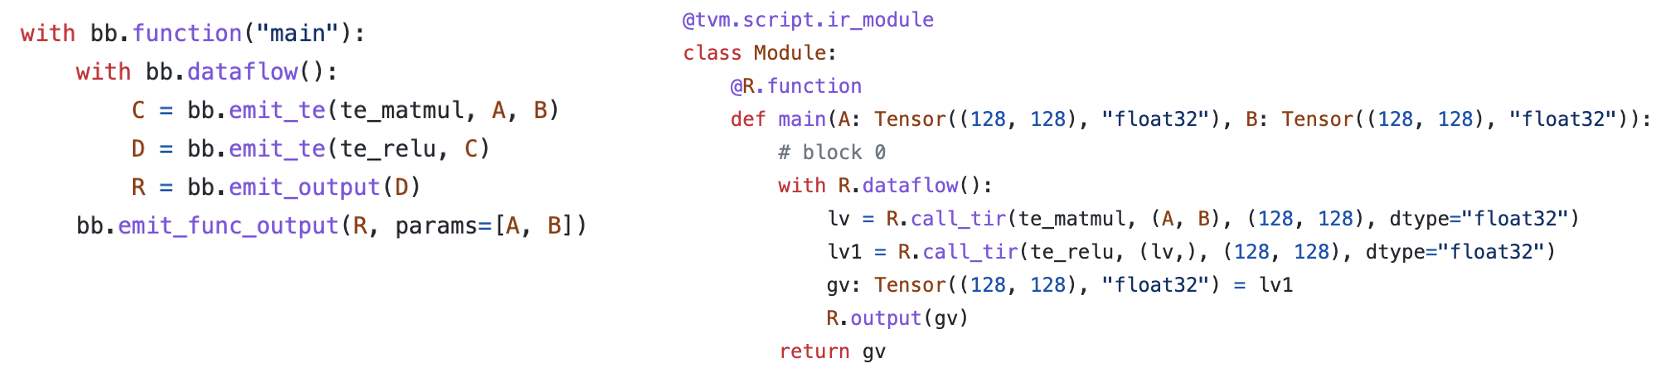
BlockBuilder 带有与 Relax 函数中相应的作用域。例如,bb.dataflow()
创建一个 dataflow block,其中所有对 BlockBuilder 的调用都处在 dataflow
block 的作用域中。
with bb.function("main"):
    with bb.dataflow():
        # every emit call generates a variable inside a dataflow block.
每个中间结果都是一个 relax.Var,对应一个存储计算结果的变量。
DataflowVar 表示该变量是 dataflow block(和计算图)内的中间步骤。
type(C)
isinstance(C, relax.Var)
Relax 函数中的每一行都是由 emit_te 调用生成的。 例如,
lv = R.call_dps_packed(te_matmul, (A, B), (128, 128), dtype="float32")
是由如下代码所生成。
C = bb.emit_te(te_matmul, A, B).
在幕后,bb.emit_te 做了以下事情:
为 A 和 B 创建一个输入
te.placeholder。通过
te_matmul函数运行它们。调用
te.create_prim_func来创建一个 TensorIR 函数。通过
call_dps_packed生成对函数的调用。
我们可以发现,上面 BlockBuilder
构造后的结果是一个有两个中间值的计算图,一个节点对应 te_matmul
操作,另一个节点对应 te_relu。
我们可以通过 bb.emit_output 创建每个 dataflow block 的输出变量。
with bb.dataflow():
    ...
    R = bb.emit_output(D)
上面的代码标志着 D 是一个可以在 dataflow block 之外引用的变量。
最后,函数输出由 bb.emit_func_output 标记。
我们只能在每个函数作用域内调用一次 emit_func_output。
值得注意的是,我们可以在输出阶段指定函数的参数列表。 这样做在我们动态收集参数列表的情况下会有帮助。
with bb.function("main"):
    ...
    # specify parameters in the end
    bb.emit_func_output(R, params=[A, B])
或者,我们也可以在函数范围的开头指定参数列表。
# specify parameters in the beginning.
with bb.function("main", params=[A, B]):
    ...
    bb.emit_func_output(R)
5.4. 从 PyTorch 导入模型
现在我们已经学习了以编程方式构建 IRModule 的工具。 让我们使用它们将机器学习模型从 PyTorch 导入成为 IRModule。
大多数机器学习框架都带有计算图抽象,其中每个节点对应一个操作,边对应它们之间的依赖关系。 我们将采用 PyTorch 模型,获取 PyTorch 原生格式的计算图,并将其转换为 IRModule。
让我们从在 PyTorch 中定义一个模型开始。 为了使示例保持一致,我们将使用 matmul + ReLU 示例。
class MyModel(nn.Module):
    def __init__(self):
        super(MyModel, self).__init__()
        self.weight = nn.Parameter(torch.randn(128, 128))

    def forward(self, x):
        x = torch.matmul(x, self.weight)
        x = torch.relu(x)
        return x
5.4.1. 创建 TorchFX GraphModule
我们使用 TorchFX 来表示来自 PyTorch 的模型的计算图。
model = MyModel()
fx_module = fx.symbolic_trace(model)
type(fx_module)
fx_module
包含一个简单的计算图,可以打印成表格便于查看。我们的目标是将此图转换为
IRModule。
fx_module.graph.print_tabular()
5.4.2. 构造映射函数
让我们定义整体的翻译逻辑。 主要流程如下:
创建一个
node_map,将fx.Node映射到相应的relax.Var,该relax.Var代表 IRModule 中的已翻译节点。以拓扑顺序迭代 FX 图中的节点。
给定映射输入,获取节点的映射输出。
def map_param(param: nn.Parameter):
    return relax.const(
        param.data.cpu().numpy(), relax.TensorStructInfo(param.data.shape, "float32")
    )

def fetch_attr(fx_mod, target: str):
    """Helper function to fetch an attr"""
    target_atoms = target.split('.')
    attr_itr = fx_mod
    for i, atom in enumerate(target_atoms):
        if not hasattr(attr_itr, atom):
            raise RuntimeError(f"Node referenced nonexistant target {'.'.join(target_atoms[:i])}")
        attr_itr = getattr(attr_itr, atom)
    return attr_itr

def from_fx(fx_mod, input_shapes, call_function_map, call_module_map):
    input_index = 0
    node_map = {}
    named_modules = dict(fx_mod.named_modules())

    bb = relax.BlockBuilder()

    fn_inputs = []
    fn_output = None
    with bb.function("main"):
        with bb.dataflow():
            for node in fx_mod.graph.nodes:
                if node.op == "placeholder":
                    # create input placeholder
                    shape = input_shapes[input_index]
                    input_index += 1
                    input_var = relax.Var(
                        node.target, relax.TensorStructInfo(shape, "float32")
                    )
                    fn_inputs.append(input_var)
                    node_map[node] = input_var
                elif node.op == "get_attr":
                    node_map[node] = map_param(fetch_attr(fx_mod, node.target))
                elif node.op == "call_function":
                    node_map[node] = call_function_map[node.target](bb, node_map, node)
                elif node.op == "call_module":
                    named_module = named_modules[node.target]
                    node_map[node] = call_module_map[type(named_module)](bb, node_map, node, named_module)
                elif node.op == "output":
                    output = node_map[node.args[0]]
                    assert fn_output is None
                    fn_output = bb.emit_output(output)
        # output and finalize the function
        bb.emit_func_output(output, fn_inputs)
    return bb.get()
我们没有在 from_fx 函数中定义函数映射。 我们将通过映射提供每个 torch
function 的翻译规则。 具体来说,以下代码块显示了我们如何通过 emit_te
API 做到这一点。
def map_matmul(bb, node_map, node: fx.Node):
    A = node_map[node.args[0]]
    B = node_map[node.args[1]]
    return bb.emit_te(te_matmul, A, B)

def map_relu(bb, node_map, node: fx.Node):
    A = node_map[node.args[0]]
    return bb.emit_te(te_relu, A)

MyModule = from_fx(
    fx_module,
    input_shapes = [(1, 128)],
    call_function_map = {
      torch.matmul: map_matmul,
      torch.relu: map_relu,
    },
    call_module_map={},
)

MyModule.show()
5.5. 回到 FashionMNIST 的例子
import torch
import torchvision

test_data = torchvision.datasets.FashionMNIST(
    root="data",
    train=False,
    download=True,
    transform=torchvision.transforms.ToTensor()
)
test_loader = torch.utils.data.DataLoader(test_data, batch_size=1, shuffle=True)
class_names = ['T-shirt/top', 'Trouser', 'Pullover', 'Dress', 'Coat',
               'Sandal', 'Shirt', 'Sneaker', 'Bag', 'Ankle boot']

img, label = next(iter(test_loader))
img = img.reshape(1, 28, 28).numpy()
import matplotlib.pyplot as plt

plt.figure()
plt.imshow(img[0])
plt.colorbar()
plt.grid(False)
plt.show()

print("Class:", class_names[label[0]])
# Hide outputs
!wget -nc https://github.com/mlc-ai/web-data/raw/main/models/fasionmnist_mlp_params.pkl
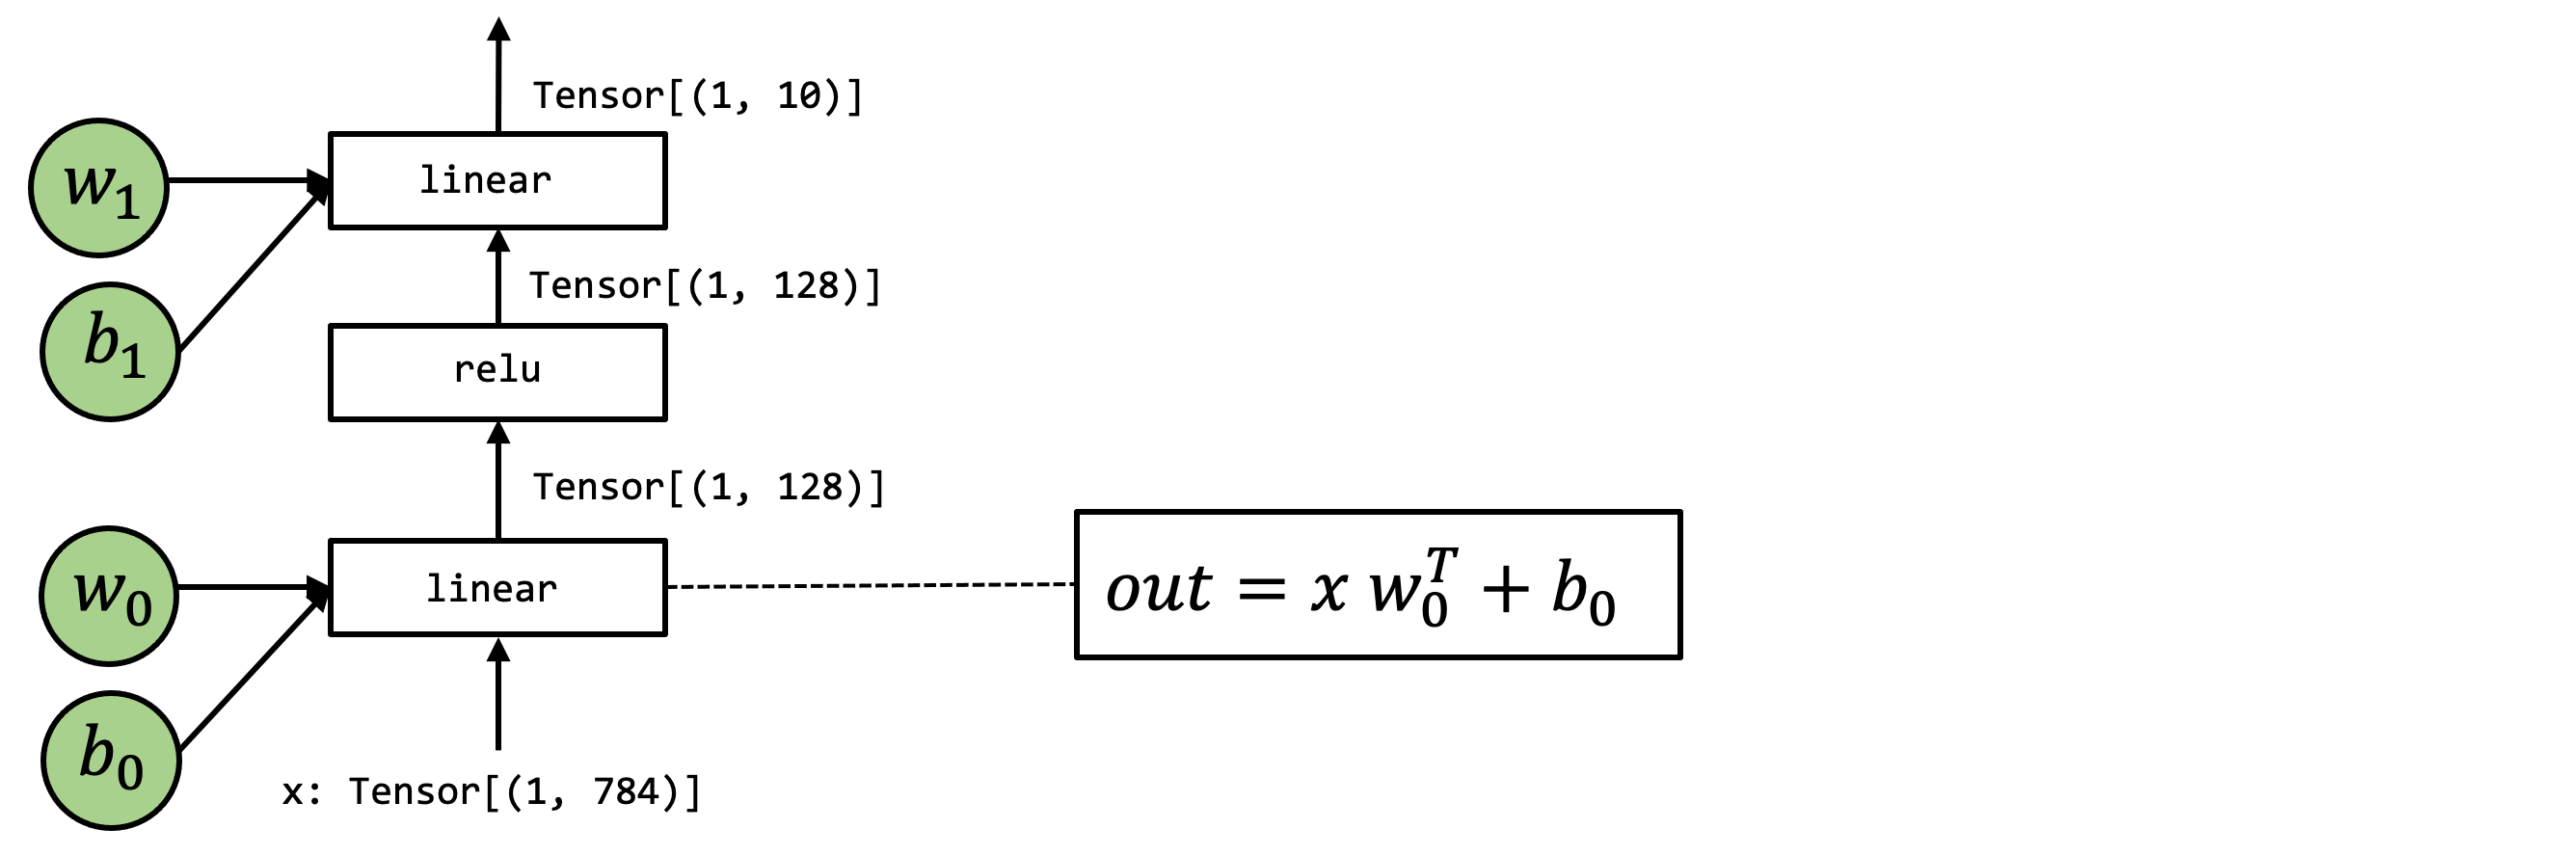
以上是我们关心的模型,我们可以按如下的方式构建其 PyTorch 模型。
class MLP(nn.Module):
    def __init__(self):
        super(MLP, self).__init__()
        self.linear0 = nn.Linear(784, 128, bias=True)
        self.relu = nn.ReLU()
        self.linear1 = nn.Linear(128, 10, bias=True)

    def forward(self, x):
        x = self.linear0(x)
        x = self.relu(x)
        x = self.linear1(x)
        return x
import pickle as pkl

mlp_model = MLP()

mlp_params = pkl.load(open("fasionmnist_mlp_params.pkl", "rb"))
mlp_model.linear0.weight.data = torch.from_numpy(mlp_params["w0"])
mlp_model.linear0.bias.data = torch.from_numpy(mlp_params["b0"])
mlp_model.linear1.weight.data = torch.from_numpy(mlp_params["w1"])
mlp_model.linear1.bias.data = torch.from_numpy(mlp_params["b1"])
torch_res = mlp_model(torch.from_numpy(img.reshape(1, 784)))

pred_kind = np.argmax(torch_res.detach().numpy(), axis=1)
print("Torch Prediction:", class_names[pred_kind[0]])
让我们尝试通过为相应的 nn.Module 定义映射函数来从 FX 转换。
在这里,我们重用了来自 TVM TOPI (TVM operator inventory) 的预定义 TE
库,而不是定义我们自己的张量表达式。
topi.nn.dense(x, w)执行转置矩阵乘法x @ w.Ttopi.add执行广播加法。
from tvm import topi


def map_nn_linear(bb, node_map, node, nn_mod):
    x = node_map[node.args[0]]
    w = map_param(nn_mod.weight)
    if nn_mod.bias is not None:
        b = map_param(nn_mod.bias)
    y = bb.emit_te(topi.nn.dense, x, w)
    return bb.emit_te(topi.add, y, b)

def map_nn_relu(bb, node_map, node, nn_mod):
    return map_relu(bb, node_map, node)


MLPModule = from_fx(
    fx.symbolic_trace(mlp_model),
    input_shapes = [(1, 784)],
    call_function_map={
    },
    call_module_map={
        torch.nn.Linear: map_nn_linear,
        torch.nn.ReLU: map_nn_relu,
    },
)

MLPModule.show()
ex = relax.build(MLPModule, target="llvm")
vm = relax.VirtualMachine(ex, tvm.cpu())
data_nd = tvm.nd.array(img.reshape(1, 784))

nd_res = vm["main"](data_nd)

pred_kind = np.argmax(nd_res.numpy(), axis=1)
print("MLPModule Prediction:", class_names[pred_kind[0]])
5.6. 备注:翻译成高层算子
在大多数机器学习框架中,有时先转换为更高一级的内置的原始算子会更有帮助。下面的代码块给出了一个例子来做到这一点。
def map_nn_relu_op(bb, node_map, node, nn_mod):
    A = node_map[node.args[0]]
    return bb.emit(relax.op.nn.relu(A))

def map_nn_linear_op(bb, node_map, node, nn_mod):
    x = node_map[node.args[0]]
    w = map_param(nn_mod.weight)
    b = map_param(nn_mod.bias)
    return bb.emit(relax.op.linear(x, w, b))

MLPModuleHighLevel = from_fx(
    fx.symbolic_trace(mlp_model),
    input_shapes = [(1, 784)],
    call_function_map={
    },
    call_module_map={
        torch.nn.Linear: map_nn_linear_op,
        torch.nn.ReLU: map_nn_relu_op,
    },
)

MLPModuleHighLevel.show()
上面展示了我们使用哪些内置的算子将模型导入为 IRModule 后的结果。这些内置算子是 比 TensorIR 函数更高级别的抽象。我们可以有不同的机会将这些原始算子进一步转换为库函数或 TensorIR 函数。
在大多数情况下,在有高级算子支持的情况下,转换为高级内置函数会很有帮助。但是,有很多情况下我们找不到对应的高级内置算子或者想直接指定
TensorIR 函数。 在这些情况下,我们可以自定义翻译逻辑或变换从而生成
call_dps_packed 或调用库函数。 通常,我们可以结合高级操作、TensorIR
和库抽象来获得最佳结果。 我们将在后续章节中讨论权衡取舍。
5.7. 讨论
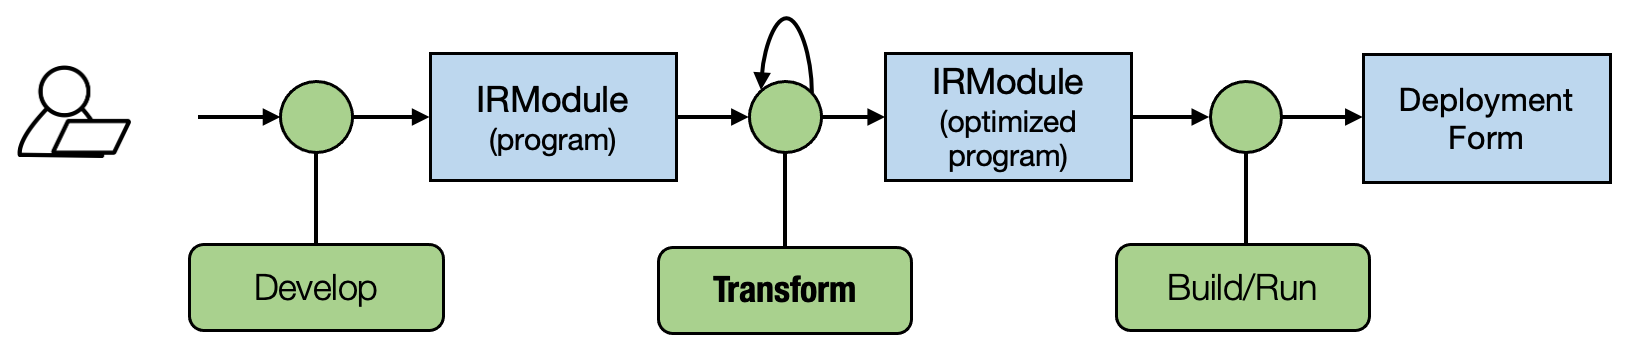
在本章中,我们重点关注了 MLC 流程的 开发 部分。 我们研究了从机器学习框架中获取模型到 IRModule 的不同方法。 我们还简要介绍了高级原始运算符。
一旦我们将模型放入 IRModule 中,我们就可以在原始函数和计算图函数上引入更多种类的变换。一个好的 MLC 流程将这些转换组合在一起,形成最终部署形式。
5.8. 总结
张量表达式 API 允许我们创建原始的 TensorIR 函数。
BlockBuilder API 通过
emit_te和其他函数创建 IRModule。通过将模型转换为 IRModule,实现与现有的机器学习框架的整合。